This chapter contains the following topic:
Statements - The Report Questions Tab
Statements - The Aging Periods Tab
The Statements selection enables you to print the customized customer statements that you designed with the Statement formats functions. See the Statement Formats chapter.
Statements are an optional feature of A/R. In most businesses it is usual to provide the customer with a statement of account at regular intervals, summarizing transactions since the last statement in addition to an invoice for each sale. Depending on how you have set up your statement formats, and what criteria you use to print them, you may think of statements as dunning letters.
Statements, unlike invoices, do not create accounting transactions. Statements therefore do not need to be posted and are never under batch control.
Before using this selection, you must set up at least one statement format, using Statement formats.
Using this selection, you can print custom statements for one or more customers. When printing statements, you are given the opportunity to mount letterhead stationery or special forms as needed.
You can use this selection to print envelopes for one or more customers. When printing statements, you are given the option to print envelopes only. This is useful if your printer does not switch automatically between envelopes and letterhead for each statement printed.
As many as three hundred line items may appear on any one statement.
Your schedule for running Fully paid open items should be coordinated with Statements. Although open items can be purged as soon as they are paid, users generally prefer to leave open items on file long enough to show as paid on one statement (but no more).
If Time and Billing is installed on your system, the customer/client must also be entered in T/B Clients or the customer/client will not print on the statement. The statement format entered in clients is used for printing the statement.
When selecting to print the statement for one specific customer you have the option of writing the statement in HTML format. An HTML formatted file can be attached to an email and sent directly to your customer via email.
You may generate, view and email PDF files. See the Statements section for more information.
A graphical image file that contains your letter head and other designs can be used to merge with the statement data when Windows printer or a Company information -PDF- or -PDFP- (Acrobat™ file type) printer is selected to print statements.
You can also print an immediate statement from View > Customers for the selected customer. See the View Customers section of the View chapter
Select
Statements from Reports, customer menu.
Graphical Mode
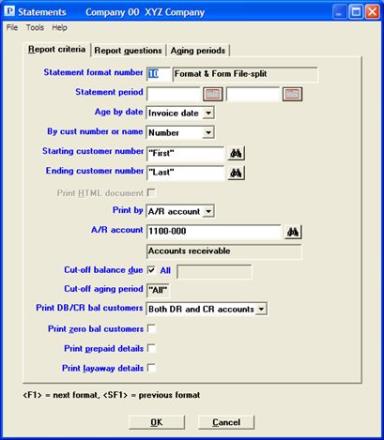
The following screen appears:

If you are accessing Statements for the first time, many of the fields are defaulted with entries from the program and from A/R Control information. You must fill in some of the fields. After the last field you will have the option to save your settings which become the defaults next time.
If you have saved the screen entries in a previous run (not necessarily in this session), then all the fields fill in with these entries.
Character Mode
Three screens are required to define statements. The following appears first:
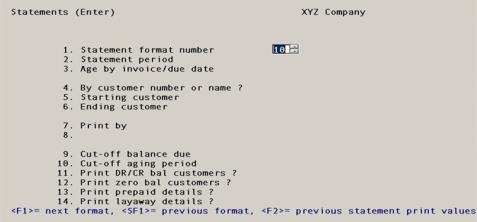
If you have saved the screen entries in a previous run (not necessarily in this session), you may use the option.
You can also print a statement for a specific customer by selecting View and then Customers from the menu. Select a customer and open item data. Then select <F7> to print a statement. Refer to the View Customers section of the View chapter for more information.
Options
Use the following options:
|
<F2> |
To restore the previous screen entries. They all display and you may change individual entries from Field number to change ?. |
The Report Criteria Tab Fields
Otherwise, enter the following information:
Enter the number of the statement format to use for these statements. This must be a valid entry in Statement formats and must have been verified. See the Statement Formats chapter for information on designing your own statement format. You may use one of the options:
Options
Use the following option:
|
<F1> |
For the next verified statement format on file |
|
<SF1> |
For the previous statement format |
|
Format |
99 The default is the default format from |
|
Example |
Type 2 |
Enter the starting and ending date for the period to be reported on the statements. Both dates can be either past or future. There can be gaps or overlaps between this period and the corresponding period of your last statement run.
For a balance forward customer, the balance is calculated up to the starting date of the period and is printed on the first line of the statement. Then all the detail lines (open items) are printed up to the ending date of the statement period.
For an open item customer, all open items are printed up to the ending date of the period.
|
Format |
Two fields, each MMDDYY |
|
Example |
Type 030110 for the starting date Type 033110 for the ending date |
This entry controls how open items are aged for the purpose of printing aged totals in the closing area of the statement.
Regardless of what you enter here, the aged totals will only include those documents that appear in the statement. Each such document will be assigned to one or another aging period, depending upon its due date or its document invoice date. In either case, documents which appear on the statement but do not fall into any of the four aging periods will not be included in the aged totals at all.
Enter either Invoice date or Due date.
|
Format |
Drop down list |
|
Example |
Select Invoice date |
You can select customers either by their numbers or their names. This also controls whether statements are printed in sequence by customer number or name within each major grouping (sales representative, account number, or zip code).
Enter either Number or Name.
|
Format |
Drop down list |
|
Example |
Select Number |
Starting customer number or name
Ending customer number or name
Enter the range of numbers or names (whichever you have specified in the By cust number or name field) for which you want to print statements. At each field you may use one of the options.
If you select the same customer for starting and ending customer, then the Print HTML document field may be entered.
Options
Use the following option:
|
<F1> |
To toggle between entering a personal name and a corporate name (if selecting customers by name) |
|
<F2> |
For the "First" starting customer or the "Last" ending customer |
|
Format |
12 characters (if entering customer number) 25 characters (if entering corporate customer name) Two subfields: 14 characters for surname, and 10 characters for personal name (if entering a person’s name) |
|
Example |
Type 200 for starting customer Type 300 for ending customer |
If the starting and ending customer is the same, then this field will display in Windows and Thin client.
Check this box to print the customer statement to HTML, or leave it unchecked to print to a printer.
|
Format |
Check box, checked is yes and unchecked is no |
|
Example |
This field may not be entered due to starting and ending customer selection |
The choices in this field depends on the selection you made for the By cust number or name field. If you selected to print by customer name, then Sales rep or None will be the choices. If you selected to print by customer number, then A/R account, Zip code or Neither will be your choices.
If you choose to print by account number or sales representative, you can select either a single account or representative, or you can select all of them. If you print by zip code, you can select any range of zip codes. In all these cases, the statements will be sequenced by customer number or name (whichever you have chosen) within the major grouping you have selected.
|
Format |
Drop down list |
|
Example |
Select A/R account |
This field only appears if you selected A/R account in the Print by field.
If only one A/R account exists that account will display automatically and the cursor will not move to this field. Otherwise, enter the A/R account number of the customers you want to print statements for. This must be a valid entry in the A/R accounts selection. You may use one of the options.
Options
Use the following options:
|
<F1> |
For the next entry in A/R accounts |
|
<SF1> |
For the previous A/R account |
|
<F2> |
For the default A/R account from Control information |
|
<F5> |
For All customers regardless of A/R account |
|
Format |
Your standard account number format, as defined in Company information |
|
Example |
Press <F2> |
Starting zip code and
Ending zip code
This field only appears if you selected Zip code in the Print by field.
Enter the range of zip codes for which you want statements printed. Customers are selected for inclusion on the basis of the zip code currently in Customers. All invoices for a selected customer within the specified time frame are included on the statement, regardless of what address they may have been shipped to or billed to. You may use the option.
Options
Use the following option:
|
<F2> |
For the "First" starting zip code or "Last" ending zip code |
|
Format |
10 characters at each field |
|
Example |
(Does not occur in this example) |
This field only appears if you selected Sales rep in the Print by field.
Enter the code of the sales representative whose customers you wish to print statements for. This need not be a valid entry in Sales reps. Customers are selected for inclusion on the basis of the current sales representative on file for them in Customers, but sales made to those customers within the specified time frame are included on the statement even if made by a different sales representative. You may use the option.
Options
Use the following option:
|
<F5> |
For All sales representatives |
|
Format |
3 characters |
|
Example |
(Does not occur in this example) |
These fields let you print statements for only those customers whose balance due is older and greater than some threshold. This lets you define statement formats for statements which, in effect, are dunning letters.
A statement will be printed for the customer if the total balance due in the cut-off period, plus all higher-numbered periods, is at least as much as the cut-off amount. (The periods referred to have not been entered yet but will be defined on a subsequent screen).
For instance, if you entered 1000 as the cut-off balance due, and next entered 2 as the cut-off aging period, statements would be printed for only those customers who owe a total of $1,000 or more in aging periods 2, 3, and 4.
In the Cut-off balance due field, you may use the option.
Options
Use the following option:
|
<F5> |
For All customers regardless of balance due. The Cut-off aging period field then displays as "All" and cannot be entered. |
In the Cut-off aging period field you may use the option:
Options
Use the following option:
|
<F5> |
For All periods |
|
Format |
999,999,999,999 for cut-off amount. Zero is not a valid entry. A digit from 1 to 4 for cut-off period |
|
Example |
Press <F5> for All |
If you entered a cut-off balance due amount in Cut-off balance due field, this field defaults to DR accounts only and may not be entered.
Otherwise, choose among:
Options
You may use the following option:
|
DR accounts only |
To print only customers with a debit balance as of the statement-ending date |
|
CR accounts only |
To print only those with a credit balance |
|
Both DR and CR accounts |
To print both |
|
Format |
One letter from the above list |
|
Example |
Select Both DR and CR accounts |
If you entered a cut-off balance due in the Cut-off balance due field, or if you entered either DR accounts only or CR accounts only in the Print DR/CR bal customers field, this field defaults to checked and may not be entered.
Otherwise, check the box to print statements for customers having a zero account balance, or uncheck it to omit such customers.
|
Format |
Check box. Checked is yes and unchecked is no |
|
Example |
Uncheck the box |
If you have entered and posted a prepaid cash type in cash receipts, then this field determines if they will print on the statement.
Check the box to print prepaid details or uncheck it to omit them on the statement.
An N (prepaid cash) type from open items is not added into the customer total on the statement. If you only have prepaid amounts in Open Items, then nothing will print for the customer if you select not to Print zero bal customers.
|
Format |
Check box, checked is yes and unchecked is no. There is no default. |
|
Example |
Uncheck the box |
This questions will only display if you are licensed for and are using PBS Point of Sale for the selected company.
If you entered a layaway payment type in Point of Sale then this field provides an option to print them on the statement.
Check the box to print layaway payments or uncheck it to omit them on the statement.
An L (Layaway payment) from open items type is not added into the customer total on the statement.
If you only have prepaid amounts in Open Items nothing will print for the customer if you unchecked the Print zero bal customers field.
|
Format |
Check box, checked is yes and unchecked is no. There is no default. |
|
Example |
Uncheck the box |
Make any needed changes. Select OK to print the report. Select Cancel to return to the menu.
Graphical Mode
The second screen appears as follows:
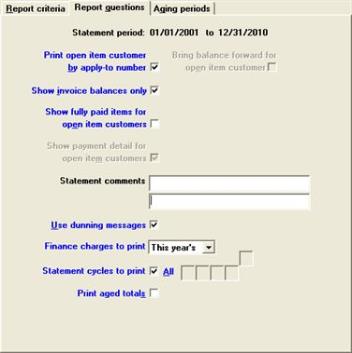
The defaults are automatically selected.
Character Mode
This screen displays:
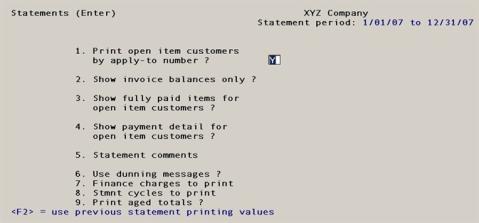
The statement period selected in the first screen displays in the heading of this screen.
If you have saved the screen entries in a previous run (not necessarily in this session), you may use the option.
Options
Use the following option:
|
<F2> |
To restore the previous screen entries. They all display and you may change individual entries from Field number to change ?. |
Report Questions Tab Fields
Print open item customers by apply-to number
Check the box to have items for open item customers appear on the statement in order by apply-to number.
Uncheck the box to not do so. This may result in printing only partial detail for any one apply-to.
|
Format |
Check box. Checked is yes and unchecked is no. The default is checked. |
|
Example |
Press <Enter> |
Bring balance forward for open-item customers
This field may only be entered if you unchecked the Print open item customers by apply-to number field.
If so, check this box to generate a balance-forward entry on the statement for any activity in the customer’s account prior to the beginning of the statement period. This entry will be dated the first day of the statement period. Uncheck this box to not show a balance forward.
|
Format |
Check box. Checked is yes and unchecked is no. There is no default. |
|
Example |
(Does not occur in this example) |
If you unchecked the Print open item customers by apply-to number field, this field cannot be entered.
Otherwise, check the box to show only invoice balances, rather than detail.
|
Format |
Check box. Checked is yes and unchecked is no. There is no default. |
|
Example |
Unchecked |
Show fully-paid items for open item customers
If you unchecked the Print open item customers by apply-to number field, this field cannot be entered.
This field enables you to omit printing fully-paid open items which have not yet been purged from A/R Open Items and for which all activity is prior to the statement period.
If you uncheck this box, such fully-paid open items will not appear on the statement. If you check this box, then all fully-paid open items will appear on the statement, even if all activity is prior to the statement period.
|
Format |
Check box. Checked is yes and unchecked is no. The default is unchecked. |
|
Example |
Press <Enter> |
Show payment detail for open item customers
If you checked the box for the Show invoice balances only field, this field cannot be entered. You have already chosen not to show detail transactions.
If you checked the box for the Print open item customers by apply-to number field, and unchecked the Show invoice balances only field, this field is automatically set to checked.
Otherwise, check this box to show every application of a payment to open items.
|
Format |
Check box. Checked is yes and unchecked is no. There is no default. |
|
Example |
(Does not occur in this example) |
This optional comment will print in the closing area of the statement, provided the statement format references them.
|
Format |
Up to two lines of up to thirty characters each |
|
Example |
Press <Enter> twice |
Check this box to use the dunning messages defined in Control information. Refer to the Control information chapter. If the aged total for periods 2, 3, or 4 (as described below) is greater than zero, then the dunning message for the oldest non-zero aged total is printed (provided the statement format has defined this field).
|
Format |
Check box. Checked is yes and unchecked is no. The default is checked. |
|
Example |
Uncheck the box for no |
Enter what finance charges to print. Finance charges must have been defined in the statement format to be included in the statement, regardless of what you enter here.
Options
You may use one of the following options:
|
Not printed |
To not print finance charges |
|
This year's |
To print this year’s YTD finance charges |
|
Last year's |
To print last year’s finance charges |
|
Format |
Drop down list |
|
Example |
Select This year's |
Enter the statement cycle codes for which you want to print statements. Statements will be printed for only those customers who have a statement period matching one of the codes that you enter.
You may enter one to five statement cycles; if you have fewer than five, enter a blank after the last cycle entered. In the first subfield you may use the option.
Options
You may use the following option:
|
<F5> |
To print statements for All statement cycles |
|
Format |
Up to five codes of one character each |
|
Example |
Press <F5> |
Check the box if you want the aged totals printed at the bottom of the statement. Aging is done according to invoice date or due date as specified in the Age by date field of the first tab.
The aging total fields must have been defined in your statement format in order for them to appear on the statement, regardless of what you enter here.
The aging periods will be defined on the third screen, even if you uncheck this box (no).
|
Format |
Check box. Checked is yes and unchecked is no. The default is unchecked. |
|
Example |
Check the box for yes |
Make any needed changes. Select OK to print the report. Select Cancel to return to the menu.
Graphical Mode
The third tab now displays:
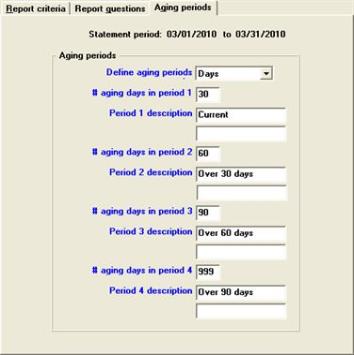
Character Mode
A screen now appears for you to define aging periods for printing statements:
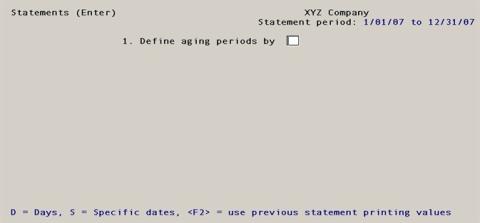
If you have saved the screen entries in a previous run (not necessarily in this session), you may use the option.
Options
Use the following option:
|
<F2> |
To restore the previous screen entries. They all display and you may change individual entries from Field number to change ?. |
If you have not saved the screen entries, you may use the option.
Options
Use the following option:
|
<F2> |
For the aging periods from Control information |
Aging Periods Tab Fields
Otherwise, enter the following information:
Type one of the following or use the option.
Options
Use the following option:
|
Days |
To define aging periods by days |
|
Specific dates |
To define them by specific dates |
|
Format |
Drop down list. There is no default. |
|
Example |
Select Days |
The remainder of the screen varies considerably depending on your response to Field #1. Each case is considered separately.
Regardless of which method you choose, it is possible to define your oldest aging period in such a way that some line items on the statement will be even older than the oldest period. Such line items will not be included in any aging period of the summary.
Similarly, if you are aging by due date instead of invoice date, it is possible for the due date of some line items to be still in the future; and so those items will fall off the aging totals on the other end.
Aging Periods By Days
If you requested aging periods by days in the Define aging periods field, the screen now appears as follows:
Graphical Mode
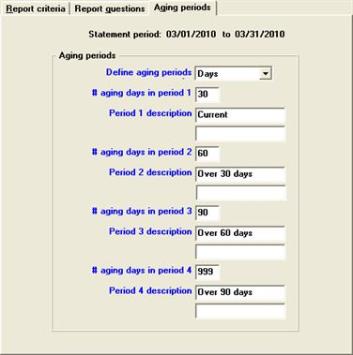
The defaults are automatically entered from A/R Control information.
Character Mode
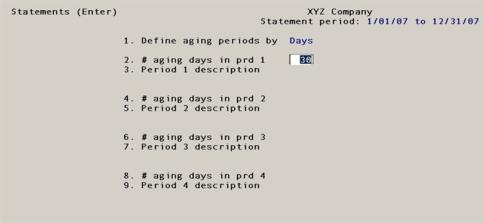
Fields are entered in numeric sequence, but to avoid much repetition similar fields are described together.
If you have not defined dunning messages on your statement format, or if you have unchecked the box for Print aged totals on the second tab, the quickest way to bypass this screen is to enter 999 in the odd-numbered fields and leave the even-numbered ones blank.
Enter the following information:
# aging days in prd 1
# aging days in prd 2
# aging days in prd 3 and
# aging days in prd 4
Period 1 is the most recent. Days must be in ascending order.
Despite the caption, what you enter here is not the number of days in each period. Instead, enter how many days it has been since the period ended, measuring backwards from the ending date of the statement period (as shown in the heading of this screen).
By convention, 999 represents all dates 999 or more days ago.
| • | If you want fewer than four aging periods, enter 999 for Period 3 or 2 in addition to Period 4. |
| • | If the highest number entered is less than 999, transactions older than that number of days will not be included in the aging totals at all. |
|
Format |
999 at each field. The default is the number of days for this period in Control information |
|
Example |
Press <Enter> at each field |
Period 1 description
Period 2 description
Period 3 description and
Period 4 description
Enter a brief description of each aging period to print on the statement.
Options
Use the following option:
|
<F2> |
For the default description for this period in |
The aging period description fields must be defined on the statement format in order for them to print, regardless of what you may enter here.
|
Format |
At each field, two lines of thirteen characters each |
|
Example |
Press <F2> |
Make any needed changes. Select OK to print the report. Select Cancel to return to the menu.
Aging Periods By Specific Dates
Graphical Mode
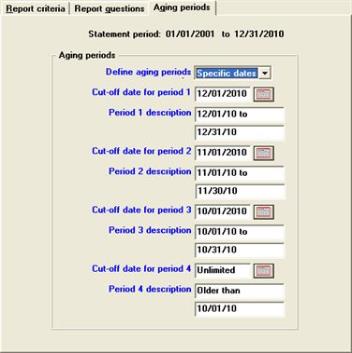
Character Mode
If you requested aging periods by specific dates in Field #1, the screen now appears as follows:
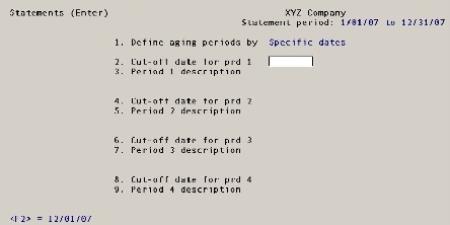
Enter the following information. Fields are entered in numeric sequence, but to avoid much repetition similar fields are described together.
Cut-off date for prd 1
Cut-off date for prd 2
Cut-off date for prd 3 and
Cut-off date for prd 4
These are the starting dates of each period. Period 1 is the most recent.
The ending dates are automatic and are not entered. Period 1 ends on the statement-ending date (as entered in Statement period field of the first tab, and as shown in the heading of this screen). Periods 2, 3, and 4 each end one day before the next period starts.
Enter the cut-off (starting) date for each period.
Options
Use the following option:
|
<F2> |
For a date thirty calendar days (not one calendar month) earlier than the statement-ending date. |
For periods 2 and 3 you may use the following option:
|
<F2> |
For a date one calendar month (not thirty days) earlier than the next period’s cut-off date. Dates at the end of a month are adjusted as necessary to allow for varying lengths of months. |
Options
For period 4 you may use the following option:
|
<F1> |
For a date one calendar month (not thirty days) earlier than the next period’s cut-off date. |
|
<F2> |
For Unlimited (meaning an infinitely remote date) |
|
Format |
MMDDYY |
|
Example |
(This screen does not occur in this example because you entered Days for the Define aging periods field) |
Period 1 description
Period 2 description
Period 3 description and
Period 4 description
Enter a description of each period. At each field you may use the option.
Options
Use the following option:
|
<F2> |
For mm/dd/yy to mmddyy, where mm/dd/yy represents a date and the two dates are the starting and ending dates of the period as described above. If <F2> was chosen in Field #8, pressing <F2> here results in Older than mm/dd/yy. |
The aging period description fields must be defined on the statement format in order for them to print, regardless of what you may enter here.
|
Format |
At each field, two lines of thirteen characters each |
|
Example |
Press <F2> |
Select OK to print the report. Select Cancel to return to the menu.
Printer Selection
After pressing <Enter> on Field number to change, enter the following information:
Please select: 1 = Review values just entered, 2 = Print statements
That question only happens in Character Mode.
Select one of the following:
|
1 |
To return to Field number to change ? of the first screen. You can then review or change any setting of any screen. |
|
2 |
To print the statements. |
If you select 2, you have the option of saving your entries for use the next time you print statements:
Save Values Just Entered ?
Select the Yes button to save these three screens as defaults. The next time that you (or another operator in this company) chooses the Statements selection, these defaults can be chosen by pressing <F2> as the first action on each screen.
Select the No button to preserve the existing defaults.
Select Printer
If you are using multiple printers, select the printer to be used from the printer menu which now appears. Statements may not be directed to disk nor displayed on the screen, but must be sent to an actual printer.
If you elected to print to HTML on the Print HTML document field, then you will be asked for a location to save the file and a name for the file. The file will be saved and the PBS Web report browser will display the statement. In the case of HTML printing, the Printer Control Station selection screen will not display.
Generate, View and Email PDF Statement Files
If you are using a -PDF- printer as set up in Company information, then the statements will be saved to PDF files.
See the PBS Administration documentation for information on a PDF printer configuration and the setup of a Company information PDF printer.
In Windows and Thin client, once the statements have been printed you may view and email these documents under the CTL menu selection Email/view printed PDF's found under PDF form file processing. The overview and configuration for emailing PDF files from PBS is found in the PBS Administration documentation Email Configuration appendix.
The statements are saved in the PDFFIL\STATEMENTS directory. Each statement is a separate PDF file. An example of the file name is xx_ARS_ATL100_20101107.PDF. The xx is the company number. ARS indicates it is an Accounts Receivable statement. ATL100 is the customer number and 20101107 is the print date. Once the files are written you may view the statement in Adobe Reader or Adobe Acrobat. If neither application is installed, the program will still create the files. In addition to viewing the statement you have other options such as email, print and so on.
You may also print a statement alignment as a PDF file. The alignment file is named xxARS_ALIGNMENT_999999.PDF and is located in PDFFIL\ALIGNMENTS directory. The xx is the company number.
Printer Control Station
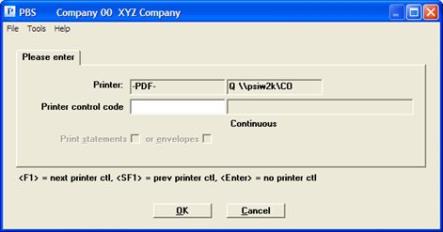
The following screen appears:
Graphical Mode
Character Mode
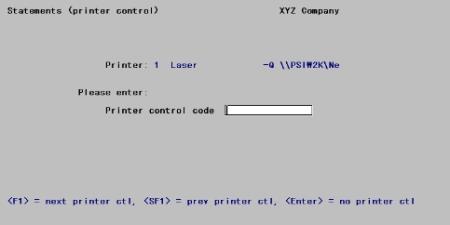
This screen displays the printer information associated with the printer chosen from the printer selection menu, and allows you to take advantage of advanced printer features.
Enter the following information:
Enter one of the control codes associated with this printer in Printer control stations (Statements) found under Master information. See the Entering Statement Stations section of the Printer Control Stations chapter.
You may leave this field blank if your printer does not support advanced features.
You may also use one of the options.
Options
Use the following option:
|
<F1> |
For the next printer control code for this printer |
|
<SF1> |
For the previous printer control code |
|
Format |
15 characters |
|
Example |
Leave the field blank by selecting the <Enter> key |
This question can only be answered only if your printer control code describes your printer as capable of printing either or both envelopes and statements in the same print run. If so, check the box to print envelopes this run, or leave it unchecked not to do so. If you left it unchecked, statements will be printed but envelopes will not.
|
Format |
Check box. Checked is yes and unchecked is no. The default is unchecked. |
|
Example |
(No example is given as this depends on what printer you have) |
This question can only be answered if your printer control code describes your printer as capable of printing either or both envelopes and statements in the same print run, and you have answered Y to Print envelopes ?. If so, answer Y to print statements in this run, or N to not print statements and only print envelopes.
|
Format |
Check box. Checked is yes and unchecked is no. The default is unchecked. |
|
Example |
(No example is given as this depends on what printer you have) |
Print statements or print envelopes
This option is only available if your printer control code describes your printer as capable of printing either envelopes or statements, but not both, in the same print run. If so, check the statements box for statements or envelopes box for envelopes.
|
Format |
Check box. Checked is yes and unchecked is no. The default is unchecked. |
|
Example |
(No example is given as this depends on what printer you have) |
Print Alignment ?
If you want a sample statement with Xs and 9s printed so you can check the alignment on the printer, select yes. A sample form will be printed. This cycle repeats until such time as you select no to the Print alignment ? question.
Alignment Screen
If this is a laser printer or Windows printer, after each alignment form is printed a screen will appear so you can adjust the alignment (on non-laser printers, adjustments are accomplished with mechanical controls).
This is the Character Mode Laser Alignment Screen:
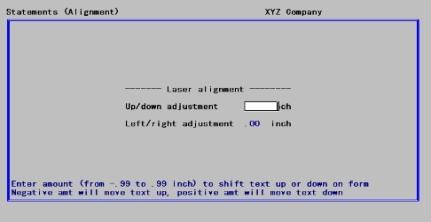
Enter the following information:
Up/down Adjustment
Enter a vertical adjustment in inches.
|
Format |
.99- The default is zero. For a Laser printer you may enter a negative or positive number, but for Windows printer only 00 or a positive number will have any effect. |
|
Example |
Press <Enter> |
Left/Right Adjustment
Enter a horizontal adjustment in inches.
|
Format |
.99- The default is zero. For a Laser printer you may enter a negative or positive number, but for Windows printer only 00 or a positive number will have an effect. |
|
Example |
Press <Enter> |
Any Change ?
Answer Y to re-enter the window, or N to accept the alignments as shown.
If you enter N, the following screen appears:
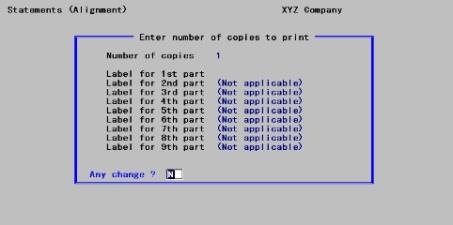
This lets you enter the number of statement copies and the labels for each copy. This screen only appears for laser printers (non-laser printers handle multiple copies by using carbon paper).
Enter the following information:
Number of Copies
Enter the number of copies to print.
|
Format |
9 |
|
Example |
Enter 1 |
Collate forms
Check this box if you want to collate statements with multiple pages and when printing multiple copies. When you select to print multiple copies to a Windows or Company information printer and there are more line items than will fit on one page, the program will collate the printed pages. Collate means: for each copy page two follows page one, page three follows page two and so on. When you do not check this field the program does not collate; it prints all the page one copies first, then it prints all page twos and so on.
Label for <nth> Part
For each copy you have specified in the previous field, enter an identifying label to print for that copy.
|
Format |
25 characters. The default is blank. |
|
Example |
Press <Enter> |
Any Change ?
Answer Y to re-enter the window, or N to accept it.
Printing the Statements
After printing, you are returned to the first screen for another print run. If you do not wish to continue printing statements, press <Esc>.
Type “Done” When Ready
Once you have pressed <Esc> (as opposed to continuing to print statements), you are instructed to de-mount your statement forms and mount stock paper on your printer. When you have done so, type DONE. This step is omitted if your statement format indicates that you print on plain paper.